Help!
Here are a few links to help you out
How to start, follow this tutorial to start installing mods! To be featured here please shoot me an e-mail :) [email protected]
The following downloads are not mine!
The Sims 3 Dog Custom Content
Useful Building/ Props Downloads |
Other's Tutorials |
|
Pose Creation
Pose Pack Creation Regional Markings Creation Movable Markings Creation Reshade 3.0 Tutorial (she uses this for TS4 but it works the same for TS3) |
China's Tutorials
Basics
Expansion packs I have: World Adventures, Pets, Late Night
Just to let you know what I'm working with I'll leave my computer specs below. The actual computer is no longer available :(
- 3.2 GHz Intel Core i5-4570 Haswell CPU
- 8GB DDR3 SDRAM
- 1TB 7200rpm Hard Drive
- NVIDIA GeForce GTX650 Graphics Card
- Windows 8.1 (64-bit)
Game Mods:
OMSP - This comes in handy because dog height sliders and posing don't always mix. Sometimes your dog will be a few inches above or below the ground and that looks unrealistic. You can also pose your dogs on top of this with this!
Pose Player - Most of you probably already have this but this is just for posing your dogs.
Nilxis Realistic Clouds - These make for wonderful outdoor pictures!
BrntWaffles Lighting Mod - These make taking pictures outside a breeze, they also work on inside lighting.
NRAAS - I use the Master Cheats as well as Portrait Panel.
No Drift/ Low Level - A camera mod that is AMAZING. Must have
HD Dog Reskin - Linked in above resources, take your dogs from 2D to 3D!
Reshade 3.0 - If you don't already have this I linked a tutorial above, I would definitely recommend this. It has honestly changed my pictures so dramatically, it can be quite tedious to install but worth it. The only kink is that I have to take screenshots differently but I've gotten used to it. It's actually hard to find presets specifically for TS3 but presets for TS4 work as well. Since the graphics are so different you may have to tweak them a bit. I recommend playing with your own reshade setting but I have 0 creativity so I went with someone else's.
Game Cheats:
testingcheatsenabled true
hideheadlineeffects on
moveobjects on
buydebug (I use the lighting in the 'buydebug' category in order to have excellent lighting. )
Editing Tips
Firstly and probably the most basic is you environment. For example, if you're looking to do an indoor shoot for a dog show I would recommend finding real life inspiration before you attempt to build anything. The more realistic the better, look at the background, fencing, decor, carpeting, wallpaper.
|
|
Now that you have a good idea of your proper venue, it's time to get a good idea of what angles look good. Typically if a dog has a turned head pose the dog will look awful from a front view, the head will be distorted and wider than usual. If you have a turned head pose you want to use I would recommend the picture be straight on from the side. Also, if you have a specific breed you're capturing maybe look for online inspiration as well. Since I have majority whippets I'll just google "whippet in show" and get some cool inspiration for that. Next make sure you have the right posing for your breed, although a boxer may look cool in a GSD stack you'll get no wins with that. I have a few breed specific pose packs as well as many other creators at the SUKC.
If you've used most, if not all of the mods I listed in "Basics" your game should already look pretty great. With my whippets I normally don't do much but detailing here and there.
AT WORK WILL FINISH WITH PICTURES LATER
If you've used most, if not all of the mods I listed in "Basics" your game should already look pretty great. With my whippets I normally don't do much but detailing here and there.
AT WORK WILL FINISH WITH PICTURES LATER
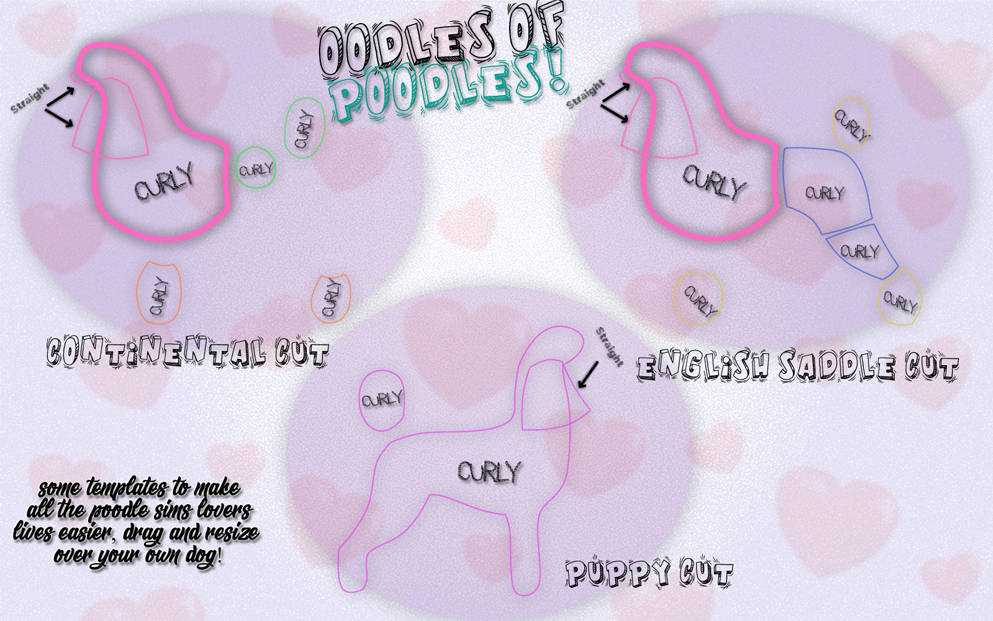
Poodle
Tools: Mouse/ Photoshop CS5 Brushes Used: Curly Hair/ Fur
I do apologize, the brush I used for the ears seems to be lost to me. If you recognize it please let me know but I put an alternate with great brushes there!
I do apologize, the brush I used for the ears seems to be lost to me. If you recognize it please let me know but I put an alternate with great brushes there!
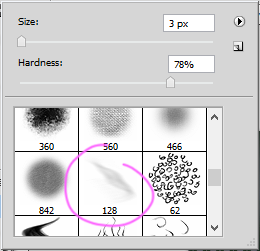
Body brush settings, this is VERY important! You can adjust the size based on the distance from the dog you are. I would recommend saving these so your brush is always ready. "New Brush Preset"
Brush Tip Shape: Size: 30px Angle: 0 Roundness: 100% Spacing: 55% Shape Dynamics: Size Jitter: 0% Control: Pen Pressure Min. Diameter" 0% Angle Jitter: 5% Control: Direction Roundness Jitter: 1% Control: Off Minimum Roundness: 25% Flip X&Y Jitter Scattering: Scatter: 81% Control: Off Count: 5% for drawing, 100% for filling in large spaces Count Jitter: 1% Control Off Color Dynamics: Brightness Jitter: 15% All other: 0% |
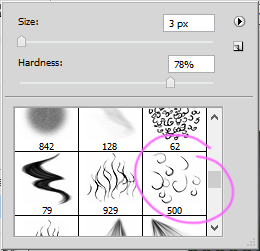
You'll have to play around with the setting on this one since the brushes you'll be using are a tad different. Just make sure they are relatively non-scattering so that the ears are straight. Also be sure that color dynamics are on so that there is dimension in the color. With most of those brushes attached you'll only have to change out the size.
Click for download!
|
